
Move the slicer in the worksheet: An essential guide to unlocking the full potential of slicers in Microsoft Excel. This comprehensive guide delves into the intricacies of slicer manipulation, empowering you to effectively filter, analyze, and present your data with unparalleled precision.
Master the art of slicer positioning, resizing, and customization to optimize readability and enhance data visualization. Explore advanced slicer techniques to unlock a world of possibilities, including multiple slicer creation, linking, and integration with other data analysis tools.
Move the Slicer in the Worksheet
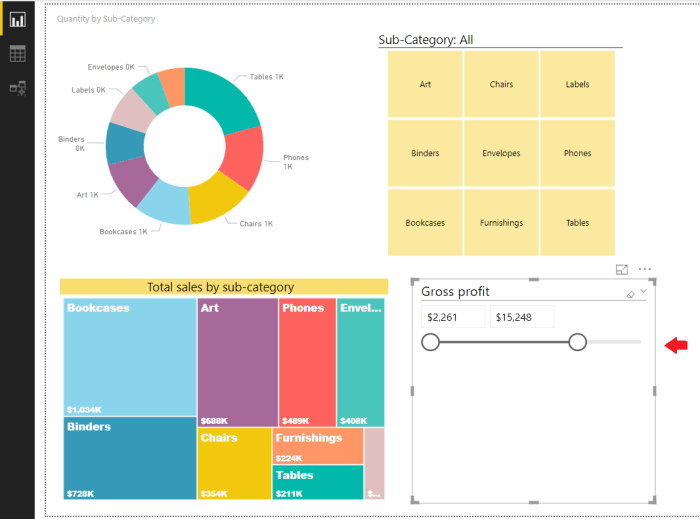
A slicer in a worksheet is a powerful tool that allows users to filter and analyze data interactively. By moving a slicer, you can adjust its position and size to optimize usability and readability within the worksheet.
Methods for Moving a Slicer
There are several methods for moving a slicer in a worksheet:
- Drag-and-drop:Click and hold the slicer’s title bar, then drag it to the desired location.
- Keyboard shortcuts:Use the arrow keys to move the slicer one cell at a time, or hold down the Ctrl key and use the arrow keys to move the slicer in larger increments.
- Slicer context menu:Right-click the slicer and select “Move” from the context menu, then choose the desired location.
Each method has its own advantages and disadvantages. Drag-and-drop is the most direct and intuitive method, while keyboard shortcuts can be more efficient for precise movements. The slicer context menu provides additional options, such as moving the slicer to a specific cell or sheet.
Positioning and Resizing Slicers: Move The Slicer In The Worksheet
When positioning and resizing slicers, consider the following guidelines:
- Placement:Position the slicer in a location that is easy to access and does not obscure important data.
- Size:Adjust the size of the slicer to accommodate the number of items it contains and the available space in the worksheet.
- Resize handles:Use the resize handles located at the edges of the slicer to adjust its width and height.
By carefully positioning and resizing slicers, you can improve the usability and readability of your worksheets.
Customizing Slicer Appearance
You can customize the appearance of a slicer to match the style of your worksheet. To do this:
- Change the color:Right-click the slicer and select “Format” from the context menu, then choose the desired color from the “Fill” tab.
- Change the font:Right-click the slicer and select “Format” from the context menu, then choose the desired font from the “Font” tab.
- Change the style:Right-click the slicer and select “Format” from the context menu, then choose the desired style from the “Style” tab.
By customizing the appearance of slicers, you can create a visually appealing and consistent worksheet.
Advanced Slicer Techniques
In addition to basic slicing, you can use advanced techniques to enhance the functionality and versatility of slicers:
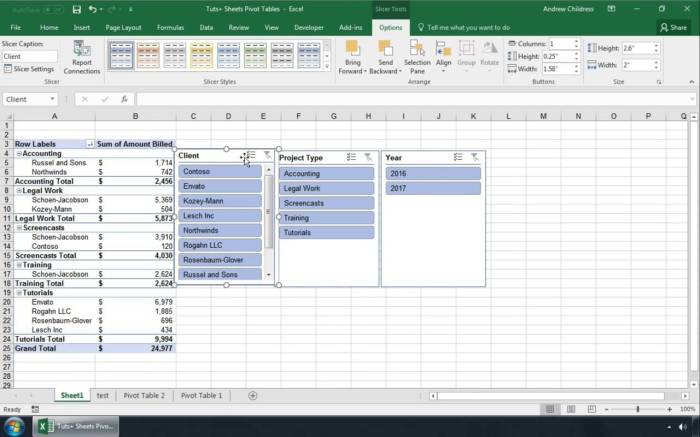
- Create multiple slicers:Use multiple slicers to filter data by different criteria simultaneously.
- Link slicers:Link slicers to each other so that when you select an item in one slicer, the other slicers automatically update.
- Use slicers with other data analysis tools:Combine slicers with other data analysis tools, such as pivot tables and charts, to create interactive and insightful dashboards.
By mastering these advanced techniques, you can unlock the full potential of slicers and create powerful data visualizations.
FAQ Insights
Can I move a slicer to a different worksheet?
Yes, you can move a slicer to a different worksheet by dragging and dropping it to the desired worksheet tab.
How do I resize a slicer to fit my data?
To resize a slicer, hover over one of its edges or corners until you see the resize cursor, then drag to adjust the size.
Can I customize the appearance of a slicer?
Yes, you can customize the appearance of a slicer by right-clicking on it and selecting “Format Slicer” from the context menu.
