Enzyme cut outs activity answers provide educators with a valuable resource to enhance student learning about enzyme structure and function. This engaging activity allows students to visualize and manipulate enzyme models, fostering a deeper understanding of the concepts involved.
This guide provides a comprehensive overview of the enzyme cut outs activity, including its objectives, preparation, procedures, expected results, and modifications. Additionally, it addresses commonly asked questions to ensure educators have all the information they need to successfully implement this activity in their classrooms.
Definition and Overview of Enzyme Cut Outs Activity
The enzyme cut outs activity is a hands-on, interactive learning tool designed to enhance students’ understanding of enzyme structure, function, and specificity.
This activity involves the use of cut-out shapes representing enzymes and substrates, which students physically manipulate to demonstrate enzyme-substrate interactions and the concept of enzyme specificity.
Materials Typically Used in Enzyme Cut Outs Activity
The materials typically used in this activity include:
- Paper or cardstock
- Scissors
- Markers or crayons
- Enzyme and substrate templates
Objectives and Learning Outcomes
The enzyme cut outs activity is designed to help students understand the structure and function of enzymes, and how they catalyze biochemical reactions. Through this activity, students will:
- Recognize the different components of an enzyme, including the active site, substrate, and product.
- Understand how enzymes bind to substrates and catalyze reactions.
- Explore the factors that affect enzyme activity, such as pH, temperature, and substrate concentration.
- Develop their critical thinking and problem-solving skills.
Skills and Knowledge Gained
By participating in this activity, students will gain a deeper understanding of the following concepts:
- Enzyme structure and function
- Enzyme catalysis
- Factors affecting enzyme activity
- The importance of enzymes in biological systems
Preparation and Setup: Enzyme Cut Outs Activity Answers
The enzyme cut outs activity requires careful preparation and setup to ensure a successful and engaging learning experience.
Materials Required
- Enzyme cut outs: These can be downloaded and printed from online resources or purchased from science supply companies.
- Scissors
- Glue or tape
- Construction paper or poster board
- Markers or crayons
Steps for Preparing and Setting Up the Activity
Follow these steps to prepare and set up the enzyme cut outs activity:
- Download and print the enzyme cut outs.Choose a set of cut outs that align with the learning objectives and grade level of your students.
- Cut out the enzyme shapes.Provide students with scissors and instruct them to carefully cut out the enzyme shapes along the dotted lines.
- Create a base for the enzymes.Provide students with construction paper or poster board to serve as the base for their enzyme cut outs.
- Glue or tape the enzymes to the base.Have students glue or tape the enzyme cut outs to the base, arranging them in a logical way that represents their understanding of enzyme function.
- Label the enzymes.Encourage students to use markers or crayons to label the enzymes with their names and functions.
Procedures and Methodology
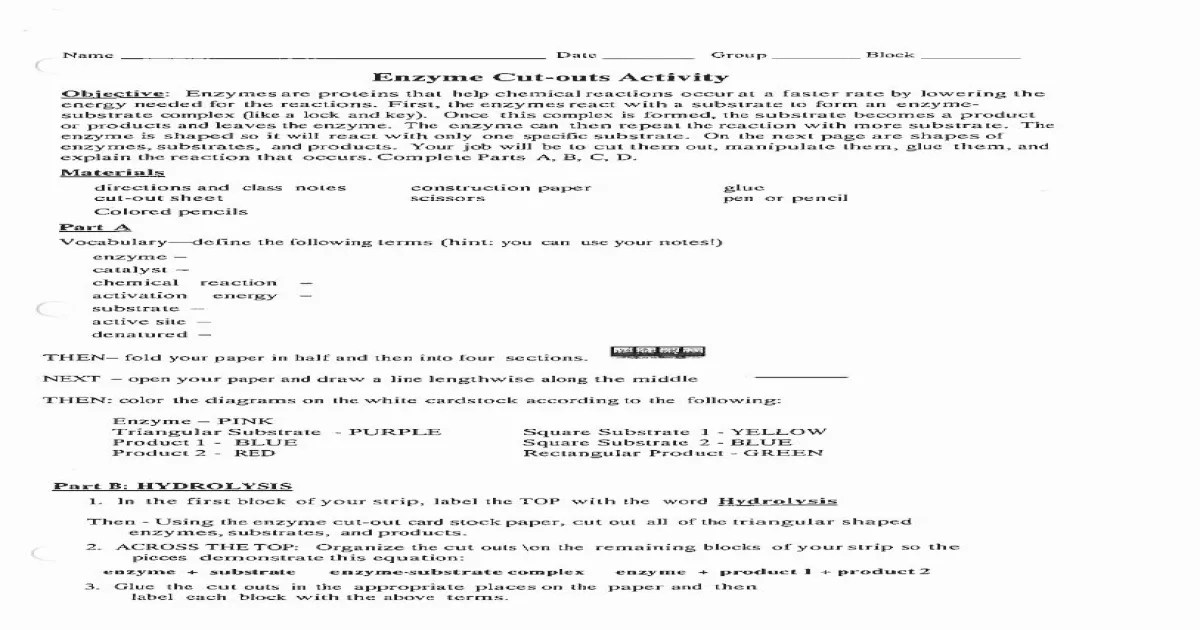
The enzyme cut outs activity is a hands-on exercise that helps students understand the structure and function of enzymes. The activity involves cutting out paper or foam core shapes representing different enzymes and their substrates. Students then assemble the cut outs to simulate the binding of enzymes to substrates and the formation of enzyme-substrate complexes.
The following step-by-step instructions provide a detailed guide for conducting the enzyme cut outs activity:
Materials
- Paper or foam core
- Scissors
- Glue or tape
- Markers or crayons
Procedure
- Draw and cut out shapes representing enzymes and substrates on paper or foam core. Enzymes can be represented by simple shapes like circles or squares, while substrates can be represented by different shapes and sizes.
- Label the enzyme cut outs with the enzyme’s name and the substrate cut outs with the substrate’s name.
- Assemble the enzyme and substrate cut outs by matching the shapes that represent the active site of the enzyme with the corresponding substrate. Glue or tape the cut outs together to form enzyme-substrate complexes.
- Analyze the enzyme-substrate complexes to identify the specific interactions that contribute to binding. Students can discuss the role of shape, charge, and other factors in enzyme-substrate interactions.
- Repeat the activity with different enzymes and substrates to explore the specificity of enzymes and the factors that affect enzyme activity.
Expected Results and Observations
In the enzyme cut outs activity, students can expect to observe the following results:
When the enzyme and substrate cut outs are matched correctly, they will fit together like puzzle pieces. This demonstrates the specificity of enzymes, which means that they only catalyze specific reactions with specific substrates.
Enzyme-Substrate Interaction, Enzyme cut outs activity answers
- The active site of the enzyme, which is the region that binds to the substrate, will be complementary to the shape of the substrate.
- The enzyme will lower the activation energy of the reaction, which is the energy required to start the reaction.
- The enzyme will increase the rate of the reaction, which is the number of reactions that occur per unit time.
By observing these results, students can gain a better understanding of the structure and function of enzymes, and how they play a crucial role in biological processes.
Modifications and Extensions
Modifications to Enhance Effectiveness
To improve the effectiveness of the enzyme cut outs activity, consider the following modifications:
- Use different types of enzymes.This will allow students to explore the specificity of enzymes and how they interact with different substrates.
- Vary the concentration of enzymes.This will allow students to investigate the effect of enzyme concentration on reaction rate.
- Add inhibitors to the reaction.This will allow students to study how inhibitors affect enzyme activity.
Extensions to Explore Related Concepts
The enzyme cut outs activity can be extended to explore related concepts in more depth. For example, you could:
- Have students research different types of enzymes.This will help them to understand the diversity of enzymes and their roles in biological systems.
- Have students design and conduct their own enzyme experiments.This will allow them to apply their knowledge of enzymes to a real-world problem.
- Have students create a presentation on enzymes.This will help them to communicate their understanding of enzymes to others.
Top FAQs
What are the benefits of using enzyme cut outs in the classroom?
Enzyme cut outs provide a tangible and interactive way for students to learn about enzyme structure and function. They allow students to visualize the different parts of an enzyme and how they interact with substrates.
How can I modify the enzyme cut outs activity to make it more challenging?
You can make the activity more challenging by using more complex enzyme models or by asking students to design their own enzymes. You can also challenge students to predict the products of different enzyme-substrate reactions.
What are some common misconceptions about enzyme structure and function that this activity can help address?
This activity can help address misconceptions about enzyme specificity, enzyme activity, and the role of enzymes in biological processes.